TOOTH MATRICES AND CONTACT POINT
Optimization of routine work with dental mactrices
WALSER MATRIX SYSTEM

A.I. Krylova
Pediatric Dentist
The formation of a solid contact point is one of the most important tasks in restoration of teeth. If a contact point is not thick, it lets through dish remains, which hurts the gums and causes chronic inflammation.
The system I would like to report about has overwhelmed me with his simple application. All needs in the filling of cavities of chewing teeth, both at milk teeth and permanent teeth, are covered by a quite number of matrix types.
Walser Matrices simplify not only the restoration of the contact point but also improve the quality of it without causing risk for overhanging fillings or a leaky contact. Already for over 50 years the Dr. Walser Dental GmbH has manufactured dental instruments which are sold worldwide and tens of thousands of dentists use the unique Walser Matrices and forceps in their practices every day. Every matrix is manufactured by hand and can be used repeatedly.
The system contains a great choice of matrices which are used in dependence of collocation and class of the carious cavity (front and posterior teeth), height of the crown and the distally defined awareness of the defect.
With the help of the Walser Matrices, teeth with MOD (mesially occlusally distally)-defect, and carious cavities in tooth gaps can be restored. Because the matrices are made of extremist thin material (0.05 mm), they are stretched without the use of a wedge into the tooth gaps.
Nevertheless, to avoid a bad contact point when restoring the teeth, wedges are often used to compensate the strength of the matrix. At the use of a X-shape matrix, greater wedges are used than at use of an O-shape matrix.
Advantages of the system
1. The attachment and remove of the matrix last only a few seconds.
2. The matrix lies tight at the tooth what prevents that blood and saliva enter into the cavity of the tooth.
3. The matrix adapts to the form of the tooth.
4. The height of the matrices varies from 5 to 8 mm. It is also possible that are different heights available in a matrix for the better customization in the case of a deeper defect of the tooth.
5. Extremist thin material – 0.05 mm.
6. After attaching the matrix, the mouth can be closed.
7. Cotton rolls can be fastened under the matrix feather.
8. Matrices last for a long time and can be sterilized in the autoclave.
9. Matrix no. 24 can be attached over a cofferdam clamp.

Photo 1 The remove of the old filling and preparations for the tooth. Attachment of the cofferdam.

Photo 2 View of the tooth before the preparation.

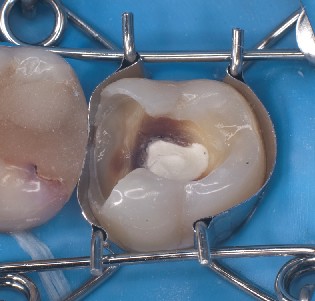
Photo 3 Attach the Walser Matrix no. 7. Checking whether the matrix is fitted exactly on the tooth.

Photo 4 Attachment of the plastic wedges Hawe Neos no. 1.

Photo 5 View of the filling after the polymerization.

Photo 6 Representation at application of the Walser matrix no. 14 for the simultaneous restoration of the cavities in tooth gaps at premolars.
Matrix 25 - is a matrix which is between two sizes and is suitable for the second milk molars. The matrices no 1, 3, 7 and 13 can also be used for milk teeth. Altogether, the company manufactures 27 matrix types.
The most common matrices of this system
- X-Shape Matrices. Used for the restoration of the two flat cavities between two adjacent teeth.
- O-Shape Matrices. Used for the restoration of the 2nd class cavities in a tooth.
- XF-Matrices. Used for front teeth.
- OF-Matrices. Used for front teeth.
- ON-Matrices. Used for ending permanent teeth and extra large molar teeth over the cofferdam clamp.
- V-Matrices. Special matrices for front teeth.

Photo 7 Preparation of the tooth and attachment of the cofferdam.

Photo 8 Careful remove of the cofferdam clamp and attachment of the Walser Matrix no. 10.

Photo 9 Etching of the tooth.

Photo 10 Disinfection of the cavity after etching with Consepsis (Ultradent) without rinsing out, duration 1-2 minutes. Drying the cavity before laying on the Composite.

Photo 11 Restoration of the cavity with the material Charisma Dimond OM and A3.

Photo 12 Restoration of the cavity with the material Charisma Dimond OM and A3.

Photo 13 View of the teeth before the definite preparation. The carious cavity which was not visualized before the beginning of the preparation is highlighted in red.
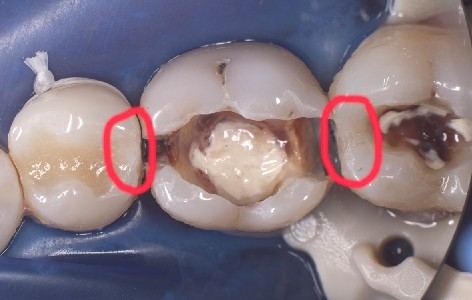
Photo 14 View of the teeth before the definite preparation. The carious cavity which was not visualized before the beginning of the preparation is highlighted in red.

Photo 15 Preparation of concealed cavities.

Photo 16 Disinfection of the cavity with Consepsis (Ultradent) before laying on the Composite.

Photo 17 Attachment of the Walser Matrix no. 10, the wedges and PET-matrices. Restoration of the cavity with the material Amelogen Plus.

Photo 18 View of the teeth before the preparation.

Photo 19 Attaching the cofferdam and preparation of the teeth.

Photo 20 Fixation of the Walser Matrix no. 8 for the restoration of the first premolar.

Photo 21 Restoration of the approximal tooth walls with the material Charisma Dimond A3.

Photo 22 Definite view of the tooth after the restoration of the occlusal surface.

Photo 23 Fixation of the Walser Matrix no. 5 for the restoration of the second premolar.

Photo 24 Definite view of the teeth after the remove of the matrix system and after polishing.

Photo 25 The Walser Matrix Set on a tray (autoclavable) and the forceps.
Based on clinical cases the advantages and the simple use of this system were demonstrated.
Here you can see how Walser Matrices are used in seconds https://www.walser-dental.com/en/walser-matrices/clips-matrix-system/

